Installation guide
Introduction
iZend is distributed in several variants. The base software program is called iZend Core or just iZend. The version which is specialized for a blog is called iZend Blog. With a different look, iZend Less integrates the CSS generator Less and the Font Awesome icons. iZend Bootstrap is entirely written with the graphical environment of Bootstrap by Twitter. All versions are installed with the same procedure, only the name of the deposit changes: izend for iZend Core, izendblog for iZend Blog, izendless for iZend Less, izendbs for iZend Bootstrap.
iZend Core

iZend Blog

iZend Less

iZend Bootstrap

Click on an image to try the initial site
Once iZend is installed, you'll have a fast and functional website looking perfect on a PC, a tablet or a smartphone which you will be able to edit and program at will.


Preliminaries
An iZend website is normally hosted by an Apache server with MySQL or PostgreSQL but it can work without a database. Choose this configuration only to put on-line a site with limited resources. Note that iZend can occupy very little space on disk.
IMPORTANT: iZend Blog requires a database.
For a professional
In a professional environment, you will most certainly want a local web server on which you will be able to develop and validate the website. Follow the entire installation procedure with care, particularly the configuration of the Apache virtual site.
For a regular person
If you don't have any particular skills in web technologies, you can simply download the last version of the software, probably iZend Blog, directly copy the whole folder of the site on the disk space of your internet provider and move on to the configuration of the site.

Linux
Install Apache, MySQL and PHP:
$ sudo apt install apache2
$ sudo apt install mysql-client mysql-server
$ sudo apt install php php-mcrypt php-gd php-curl php-mysql libapache2-mod-php
NOTE: iZend is now validated with PHP 8, PHP 7 and MySQL 8 but still works with PHP 5.3 and MySQL 5.5.
During the installation of MySQL, choose a password for the DB administrator. Write it down.
If the installation of MySQL didn't set a password for the user root, try this:
$ sudo mysql -u root -pPress Enter without typing a password.
Since version 8 of MySQL, enter the following order:
mysql> ALTER USER 'root'@'localhost' IDENTIFIED WITH caching_sha2_password BY 'password';For a previous version of MySQL, enter the following orders:
mysql> USE mysql;
mysql> SET PASSWORD FOR 'root'@'localhost'=PASSWORD('password');
mysql> FLUSH PRIVILEGES;
In another window, try the command mysql -u root -p and enter the new password.
If access is granted, enter quit to exit.
Add your account to the group www-data:
$ sudo adduser izend www-dataNOTE: replace izend by your account name.
Install phpMyAdmin for more comfort:
$ sudo apt install phpmyadminDuring the installation, use the arrows to choose to reconfigure Apache, press the space bar then Enter. Use the password you have given to the DB administrator when configuring MySQL.
Check that everything is in place by launching phpMyAdmin:
enter localhost/phpmyadmin in the address bar of your navigator
then identify yourself with the name root and the password you have assigned to the DB administor.
Adminer is an alternative to phpMyAdmin:
$ sudo apt install adminerEnter localhost/adminer in the address bar of your navigator.
To install PostgreSQL as an alternative to MySQL:
$ sudo apt install postgresqlThe installation procedure has created a user account postgres and a group postgres.
This account is associated to the administrator of the DB:
$ sudo -s
# su - postgres
$ psql
psql (9.5.4)
Type "help" for help.

postgres=#
Protect the DB administrator's account with a password:
postgres=# ALTER USER postgres with encrypted password 'your_password';
ALTER ROLE
postgres=#
Quit psql :
postgres=# \qGo back in your environment:
$ ^D
# ^D
Restart the server:
$ sudo systemctl restart postgresqlInstall phpPgAdmin for more comfort:
$ sudo apt install phppgadminEdit the file /etc/apache2/conf-available/phppgadmin.conf to comment out the order Require local:
#Require localMake sure this configuration file is enabled:
$ sudo a2enconf phppgadminEdit the file /etc/phppgadmin/config.inc.php and modify the following parameters:
$conf['extra_login_security'] = false;
$conf['show_advanced'] = true;
To connect to the DB with Adminer, edit the file /etc/postgresql/*/main/pg_hba.conf :
# TYPE  DATABASE        USER            ADDRESS                 METHOD

# "local" is for Unix domain socket connections only
local   all             all                                     md5
# IPv4 local connections:
host    all             all             127.0.0.1/32            md5
Restart the server :
$ sudo systemctl restart postgresqlIMPORTANT: When configuring the connector to the DB, to access a local PostgreSQL server, use the IP address 127.0.0.1 instead of localhost.


Windows
Install Xampp for Windows in the folder C:\xampp.
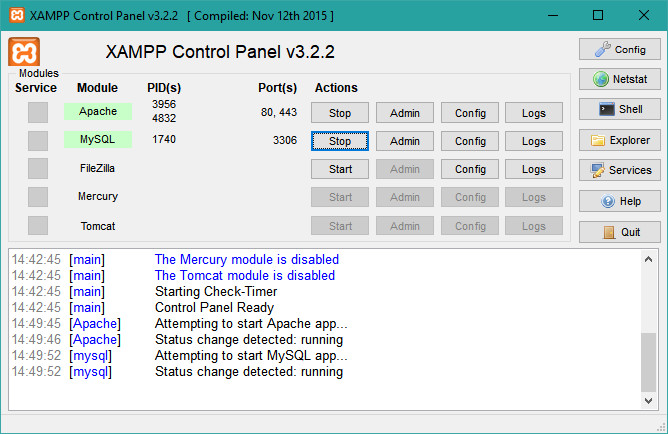
Enter localhost in the address bar of your navigator.
IMPORTANT: You must protect the root account of the DB by a password.
Click on the tab phpMyAdmin and in User accounts, add the same password to all the root accounts. Don't forget it.
Edit the file C:\xampp\phpMyAdmin\config.inc.php and set the configuration parameter $cfg['Servers'][$i]['auth_type'] to the value 'cookie'.
Restart the MySQL and the Apache servers from the Xampp console.
Check if you can identify as an administrator of the DB with phpMyAdmin.

Download
iZend relies on Git to distribute new releases. With Git, you will be able to modify the original code, which you are encouraged to do, while tracking changes in the official repository, and upgrading your website will be amazingly simple and robust.
IMPORTANT: You can directly download an iZend archive from GitHub but if you edit the code, updates will be more difficult.
Linux
Install Git:
$ sudo apt install git-core
Windows
Install Git for Windows.
Run Git Bash from the shortcut on the desk to start the command processor and run git in a bash environment.
Option
To run git in the command processor of Windows, create a file called env.bat in your home folder with the following content:
set PATH=%PATH%;%ProgramFiles%\Git\bin
set HOME=%HOMEPATH%
Adds the folder with the git command to the PATH variable.
If you have a 64-bit PC, replace %ProgramFiles% with %ProgramFiles(x86)%.
The HOME variable is useful to programs ported from Unix, like ssh.
Create a shortcut in the same folder. Configure the target so that it executes the order %comspec% /k env.bat. This line launches the command processor and tells it to start by running the content of the file env.bat.
Rename the shortcut to Git Prompt.
If you prefer a graphical interface, you can also install TortoiseGit.
Initialization
Initialize the directory of your site:
$ git init /var/www/sitename.net
$ cd /var/www/sitename.net
NOTE: Xampp puts the documents in the folder htdocs of the installation folder, e.g. C:\xampp\htdocs. Replace /var/www/sitename.net by C:\xampp\htdocs\sitename.net.
IMPORTANT: With Git Bash, you are in a Linux like command processor. Enter the following commands:
$ git init /c/xampp/htdocs/sitename.net
$ cd /c/xampp/htdocs/sitename.net
NOTE: Don't type the $ which is the prompt character of the command processor.
Declare your identity:
$ git config user.name yourname
$ git config user.email yourname@sitename.net
Pull out the current version of iZend Core, iZend Blog, iZend Less or iZend Bootstrap in a branch called izend:
$ git remote add izend https://github.com/izend/izendor
$ git remote add izend https://github.com/izend/izendblogor
$ git remote add izend https://github.com/izend/izendlessor
$ git remote add izend https://github.com/izend/izendbsthen
$ git fetch izend
$ git checkout -b izend izend/master
To pull out iZend Blog, iZend Less or iZend Bootstrap in a branch called respectively izendblog, izendless or izendbs:
$ git remote add izendless https://github.com/izend/izendless
$ git fetch izendless
$ git checkout -b izendless izendless/master
Go to your master branch:
$ git checkout -b master
$ git branch
  izend
* master
Apache
Make sure the Apache server is allowed to read all the files and to write the configuration files includes/config.inc, includes/db.inc and includes/aliases.inc, the directories log and avatars and the file sitemap.xml:
$ cd /var/www/sitename.net
$ sudo chgrp -R www-data .
$ find . -type d -print0 | xargs -0 chmod 775
$ find . -type f -print0 | xargs -0 chmod 664
NOTE: The name of the execution group of the server www-data is defined by the Group directive, generally in the file /etc/apache2/apache2.conf.
Protect the configuration files:
$ cd /var/www/sitename.net/includes
$ chmod 660 config.inc db.inc aliases.inc paypal.inc payline.inc
Create a link to the file /etc/apache2/mods_available/rewrite.load in the directory /etc/apache2/mods_enabled:
$ cd /etc/apache2/mods-enabled
$ sudo ln -s ../mods-available/rewrite.load .
Under Windows, check that the rewrite module is activated by Apache.
Look for the following line in httpd.conf:
LoadModule rewrite_module modules/mod_rewrite.soAdd a file called sitename.net.conf in the directory /etc/apache2/sites-available with the following content:
DocumentRoot /var/www/sitename.net
ServerName local.sitename.net
## ServerAlias sitename.net
## php_admin_value open_basedir /var/www/sitename.net
## php_admin_value upload_tmp_dir /var/www/sitename.net/tmp
</VirtualHost>
<Directory /var/www/sitename.net>
AllowOverride all
Require all granted
</Directory>
IMPORTANT: Since Apache 2.4, the name of the configuration file of a virtual host must end with .conf and you must add the directive Require all granted.
NOTE: The directive php_admin_value open_basedir limits the access to files in PHP to the directory of the site.
The directive php_admin_value upload_tmp_dir defines the directory where files which are uploaded are copied temporarily.
Create the directory /var/www/sitename.net/tmp and make it writable by the Apache group:
$ mkdir /var/www/sitename.net/tmp
$ chmod g+sw /var/www/sitename.net/tmp
$ sudo chgrp www-data /var/www/sitename.net/tmp
Create a link to the file /etc/apache2/sites-available/sitename.net in the directory /etc/apache2/sites-enabled:
$ cd /etc/apache2/sites-enabled
$ sudo ln -s ../sites-available/sitename.net.conf .
Reload Apache:
$ sudo /etc/init.d/apache2 reloadNOTE: Xampp defines the virtual sites in the file httpd-vhosts.conf in the folder apache\conf\extra of its installation folder, e.g. C:\xampp\apache\conf\extra. Copy the directives VirtualHost and Directory in this file. Replace /var/www/ by C:\xampp\htdocs. Don't forget to create the directory C:\xampp\htdocs\sitename.net\tmp. Restart Apache from the control panel.
IMPORTANT: Make sure that the directive NameVirtualHost *:80 is defined in the file /etc/apache2/ports.conf under Linux or in the file C:\xampp\apache\conf\extra\http-vhosts.conf forXampp.
If you have installed Apache 2.4, this directive is no longer necessary.
Edit the configuration file of PHP, /etc/php/*/apache2/php.ini under Linux, C:\xampp\php\php.ini for Xampp, to define the name of the mail server of your internet provider.
NOTE: If you have a local mail server, specify localhost.
; For Win32 only.
; http://php.net/smtp
SMTP = smtp.gmail.com
; http://php.net/smtp-port
smtp_port = 25
; For Win32 only.
; http://php.net/sendmail-from
;sendmail_from = postmaster@localhost
; For Unix only. You may supply arguments as well (default: "sendmail -t -i").
; http://php.net/sendmail-path
;sendmail_path =
; Add X-PHP-Originating-Script: that will include uid of the script followed by the filename
mail.add_x_header = Off
DNS
Add the following line in /etc/hosts:
127.0.0.1 local.sitename.netNOTE: Windows keeps the hosts file in the folder C:\Windows\System32\drivers\etc.
If you have a database server, add an alias for its host system:
127.0.0.1 local.sitename.net dbhostnameNOTE: In order to facilitate the synchronization of your development site with the production site, the local DB server and the on-line DB server are designated by the same host name.
Start your web navigator and enter local.sitename.net in the address bar to run the configurator.
In case of a problem, check the following points:
- Apache is allowed to read all the directories and all the files in /var/www/sitename.net.
- The
rewritemodule is properly loaded by Apache. - The host name local.sitename.net has the IP address 127.0.0.1.
- The host name local.sitename.net is properly listed by the command
sudo apache2ctl -S.
To check the Apache configuration, add a file called phpinfo.php with the following content in the document directory of the server:
Type localhost/phpinfo.php in the address bar of your navigator and look for the list of modules loaded by Apache.
Use the ping command to check if the host name local.sitename.net is resolved to the local IP address:
$ ping local.sitename.netSecuring
IMPORTANT: If the website isn't configured in HTTPS, leave the parameter session.cookie_samesite in the file includes/settings.incto 'Lax'.
Set this parameter to 'None; Secure' only if the connection is secured.
The option Secure blocks the exchange of the session cookie if the connection isn't encrypted.
Without a session, all the forms which use a token, like the installation form, will not work.

Configuration
You are now ready to create the initial website. Enter local.sitename.net in the address bar of your navigator. The Installation page takes care of all the details. Read the introduction and prepare the necessary information:
- The site name without a
wwww.prefix such assitename.net. - The email address of the person in charge of the website such as
webmaster@sitename.net. - The default language of the website such as
enorfr. - The manager of the database such as
MySQLorPostgreSQL. - The name of the database such as
sitenamedb1. If you want to dedicate a specific database to the website, you will need the name and the password of the user allowed to create a database. - The host name of the database server of the production site.
Use the name you have associated to
local.sitename.netin the file /etc/hosts. - The user name and the password used to access the database.
- The prefix used to uniquely name the tables in the database such as
sitename_. - The name and the password of the administrator of the website. This special user with number 1 has all the privileges.
IMPORTANT: Use the same database host name, user name and password for your development site and the production site.
Fill in the form and press Configure. The configurator writes the configuration files of the website and offers to load the home page.

In case of error, check that the database connector in the file includes/db.inc matches the expected configuration.
$db_prefix = 'sitename_';
$db_debug = false;
Alternatively, check the tables user and db in the mysql database.
If the configurator isn't allowed to modify some files, an error message is displayed followed by some instructions to correct the problem.
Example
The server isn't allowed to modify the following files in the folder /var/www/sitename.net:
- includes/aliases.inc
- logos/sitelogo.png
- sitemap.xml
- avatars
- log
To modify the access rights, try the following command:
$ cd /var/www/sitename.net; chmod a+w includes/aliases.inc logos/sitelogo.png sitemap.xml avatars log
Progress
Commit this initial version:
$ git status
$ git add --all
$ git commit -m"Initial website by iZend"
$ git status
$ git log --graph --oneline
Upgrade
Go to the izend branch:
$ git branch izendPull out the current version of iZend:
$ git pullReturn to the master branch:
$ git branch masterMerge the izend branch with the master branch:
$ git merge --no-commit izendSolve possible conflicts and commit this version of your site up-to-date with iZend:
$ git commit -m"Merges izend/master"Going on-line
If the site uses a new DB, create it on the host system with an utf8_general_ci collation.
If the site connects to the DB with a new user, create it in the table user of the DB mysql. Set the field Host to localhost and the fields User and Password to the values specified during the configuration - see the file includes/db.inc.
Don't give any privileges to the user. Only root has the right to execute all operations on all the databases.
IMPORTANT: Decode the password in the URL with the function urldecode.
$ cat includes/db.inc
global $db_url, $db_prefix, $db_debug;

$db_url = 'mysql://dbname:hZ7F4%7B%5DO9%26@localhost/dbuser';
...
$ php -a
php > echo urldecode('hZ7F4%7B%5DO9%26');
hZ7F4{]O9&
Add an entry in the table db of the DB mysql with the field Host set to localhost, the fields Bd and User to the values specified during the configuration and the privileges Select, Insert, Update and Delete.
Export all the tables of the DB of your local site and import them in the DB of the host system.
Copy the directory of your local site on the host system of your site on-line. If the parameters for the DB connection are different, edit the file includes/db.inc on the host system.
Comments